MongoDB Atlas® Admin API
Summary
This document covers the information to gather from MongoDB Atlas in order to configure a Qarbine data service to interact with the Atlas Administration API. The data service will use the Qarbine Atlas_API driver. You can define multiple data services that access the same Atlas endpoint though with varying credentials. Once a data service is defined, you can manage which Qarbine principals have access to it and its associated Atlas administration data. A Qarbine administrator has visibility to all data services.
Overview
The MongoDB Atlas DBaaS service (www.mongodb.com/atlas) has an administration API for interacting which includes accessing configuration information such as clusters, along with retrieving invoices. This API is independent from using the MongoDB query language to query the stored application data itself. Only read interactions are supported by the Qarbine interface to the Atlas API. The Qarbine Atlas API driver is aware of most entry points up through version 2 of the MongoDB Atlas API. For more details see https://www.mongodb.com/docs/atlas/api/.
MongoDB Atlas Configuration Overview
You must allow the Qarbine server to access the Atlas administration API. The requires:
- obtaining an access token and
- allowing the Qarbine host (deployed how you see fit) to your Atlas instance.
Token can be obtained to access:
- operational information or
- billing information.
Qarbine Atlas reporting requires a read only Atlas API key. You can obtain an Atlas API key using the instructions at
Additional useful links are
Atlas API Key Granularity Options
The Atlas API keys used by Qarbine should be limited to read only access. You can define API keys at the organizational and/or project level.
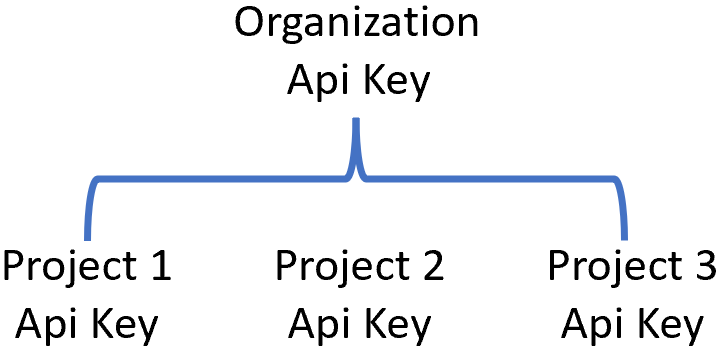
You can define multiple Qarbine Data Services based on what granularity you want to permit. In the upper left, you can change your context by selecting your organization and project from the drop down menus.
Obtaining an API Key
Decide on the granularity of the Atlas API key and any network access restrictions. You can configure different Qarbine Data Services with different Atlas API keys and then control their visibility to users to meet your operational requirements.
Log on to Atlas at https://cloud.mongodb.com/
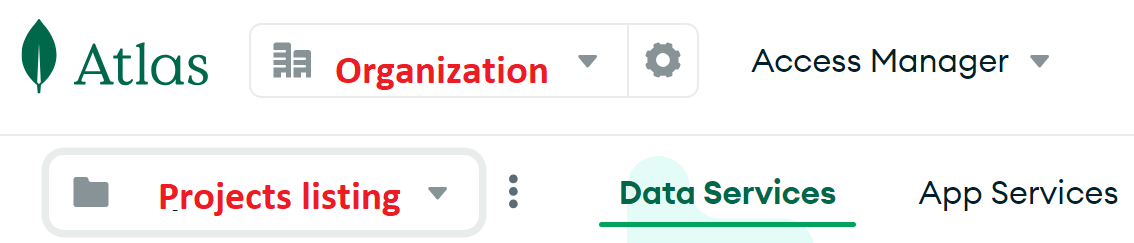
The API keys can be set at either the organization or project level. Navigate to the desired level.
Select the “Applications” tab.

Click

Click

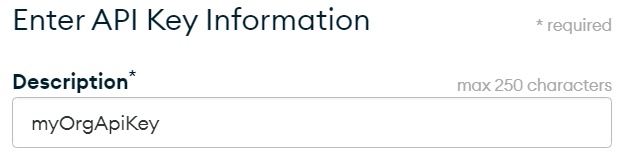
Enter a name
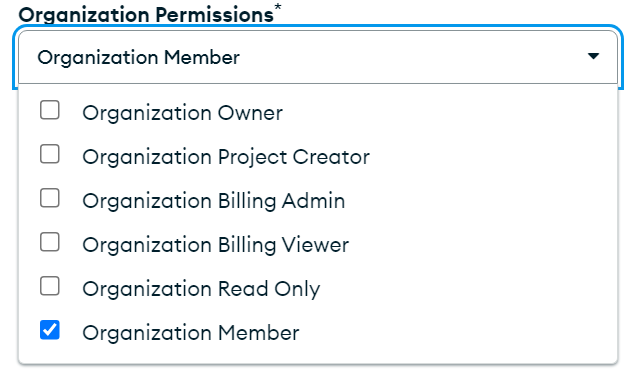
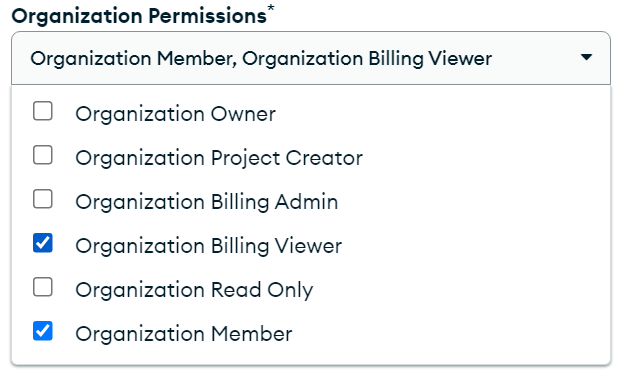
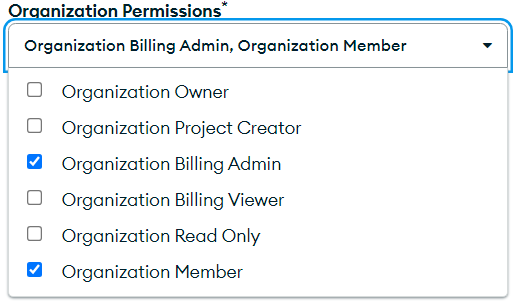
Decide on the permissions such as this basic option
To also access billing information use
Click

In the page shown below
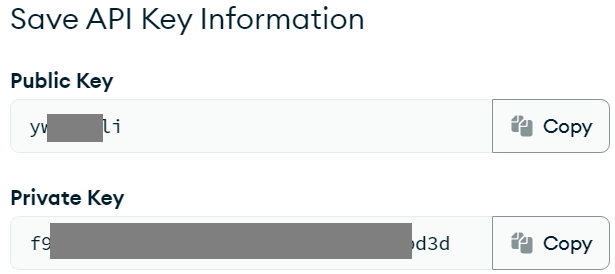
copy the values into a temporary location. They will be used to configure the Qarbine Data Service.
Click

Decide your access requirements.
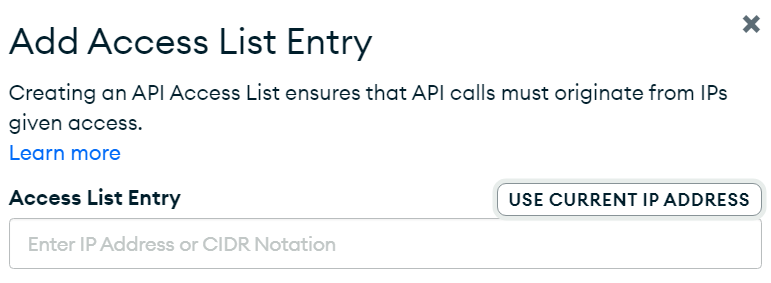
It is the IP address of the Qarbine host and not of user browsers that must have access.
In the Data Source Designer or when running any query, you will see the following when an IP address is not permitted for the associated Atlas API key.

Once completed, back in the main page click

The new API key is listed.

Verify the number of projects visible to the API key.
If necessary add projects by navigating to the project’s Access Manager.

Click

Locate the API key.

Set the permissions.

Click
Remember, the Atlas API keys used by Qarbine should be limited to read only access. An example page is shown below. Adjust the permissions based on your analysis requirements. You can define multiple Qarbine data services with varying API keys and associated permissions.
Adjusting Permissions
To edit an existing API key’s permissions click its button on the row’s right hand side

Follow the prompts to define or update the API Key.
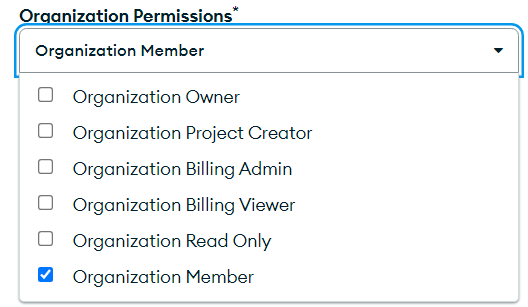
For general inquiries the following permissions may be used.
For any analysis interactions retrieving invoicing, use these permissions .
An incorrect Atlas API key as set by the Qarbine Administrator may result in the following,

Qarbine Configuration
Compute Node Preparation
Determine which compute node service endpoint you want to run this data access from. That URL will go into the Data Service’s Compute URL field. Its form is “https://domain:port/dispatch”. A sample is shown below.

The port number corresponds to a named service endpoint configured on the given target host. For example, the primary compute node usually is set to have a ‘main’ service. That service’s configuration is defined in the ˜./qarbine.service/config/service.main.json file. Inside that file the following driver entry is required
"drivers" :[
 . . .
"./driver/atlasApiDriver.js"
]
If you end up adding that entry then restart the service via the general command line syntax
pm2 restart <service>
For example,
pm2 restart main
or simply
pm2 restart all
Data Service Definition
Open the Administration Tool.
Navigate to the Data Services tab.

A data service defines on what compute node a query will run by default along with the means to reach to target data. The latter includes which native driver to use along with settings corresponding to that driver. Multiple Data Sources can reference a single Data Service. The details of any one Data Service are thus maintained in one spot and not spread out all over the place in each Data Source. The latter is a maintenance and support nightmare.
To begin adding a data service click

On the right hand side enter a data service name and description.

It is recommended you use this name as well because the example components reference this data service name. Here is the text to copy.
Atlas Virtual DB @orgName
Also choose the “Atlas_API” driver.

The server template is the base API endpoint.

Here is the text to copy.
https://cloud.mongodb.com/api/atlas/v1.0/
The server options contain the API key’s public and private key values.
 ,
,
You can reference environment variables using the syntax %NAME%. Any strings should be quoted and the key\value pairs separated by commas.
Dynamic Data Services (optional)
Overview
Qarbine’s “dynamic data service” feature mentioned above enables data sources and templates to refer to a general data service by name and have the final data service resolved at runtime. For example, the data service “Atlas VirtualDB @orgName” can be configured with an Atlas API key for the default organization. In this scenario there are also two other data services defined:
| Data Service Name | Description |
|---|---|
| Atlas Virtual DB Prod | Configured with the Atlas API key for Production deployment. |
| Atlas Virtual DB Test | Configured with the Atlas API key for Test deployment. |
The ‘@orgName’ placeholder in the referenced data service name may be dynamically replaced at runtime with a value in the following priority order:
- one that has been prompted for,
- one that has been passed in as a runtime variable,
- a value in the Qarbine principal’s annotations, or
- an annotation value in a principal’s referenced access group.
Each of the separate data service objects below

and

has its own API key and other settings.
Test the specific settings by clicking on the icon noted below.

You should see the following general dialog

Save the Data Service by clicking on the image highlighted below.

The data service will be known at the next log on time.
Principal Annotations
The Qarbine administrator sets a principal’s annotations. Also note that the determined data service must still be visible to the principal as well. This visibility is set by the Qarbine administrator.
For the sign on principal

adjust the annotations as required.

Then click on the toolbar button.

End User Set Annotations
End users may also change their annotations by clicking in the upper right of a tool.

In the dialog, navigate to the tab shown and enter key\value pairs separated by commas.

Then click

Then dismiss the subsequent dialog.

The determined data service must still be visible to the principal as well to actually end up using.
Access Group Annotations
Access groups provide a convenient way to define options for a set of principals. For the access group principal

adjust the annotations as required.
Then click on the toolbar button.
Caveats
When using the Qarbine query tools if you are switching “orgName” values then you may need to use control-click for the Run button to clear any cached variable values. Some cache clearing is automatically done.